
⚙️ A Practical Guide to Setting Up Claude Code (No Coding Required)
Module 2 of my tutorial series on moving from chatbots to a working reporting system: turning the idea into a real, working setup

If you read Module 1 and thought “okay, this sounds useful but I have no idea where to start”, this is the module for you.
We’re going to set everything up together, step by step. No coding background required. If you can create folders on your computer and follow instructions, you can do this.
By the end, you’ll have Claude Code running on your machine, a folder structure ready for your work, and you’ll have tested it with a real task.
Let’s go! 💪
What We’re Setting Up Today
Here’s the checklist:
Install VS Code (the workspace where Claude lives)
Install Claude Code (the actual AI assistant)
Feel slightly betrayed by the term no code in this tutorial
Create your folder structure
Write your first system instructions
Test it with a real task
Time: 30-45 minutes Cost: Free (VS Code) + $20/month (Claude Pro subscription) Technical skill required: Can you create folders on your computer? You’re good.
Want to Try Something Simpler First?
If you’re not ready to commit to the full setup, or you just want to experiment with a simpler interface, Anthropic just released Cowork for Claude Pro subscribers.
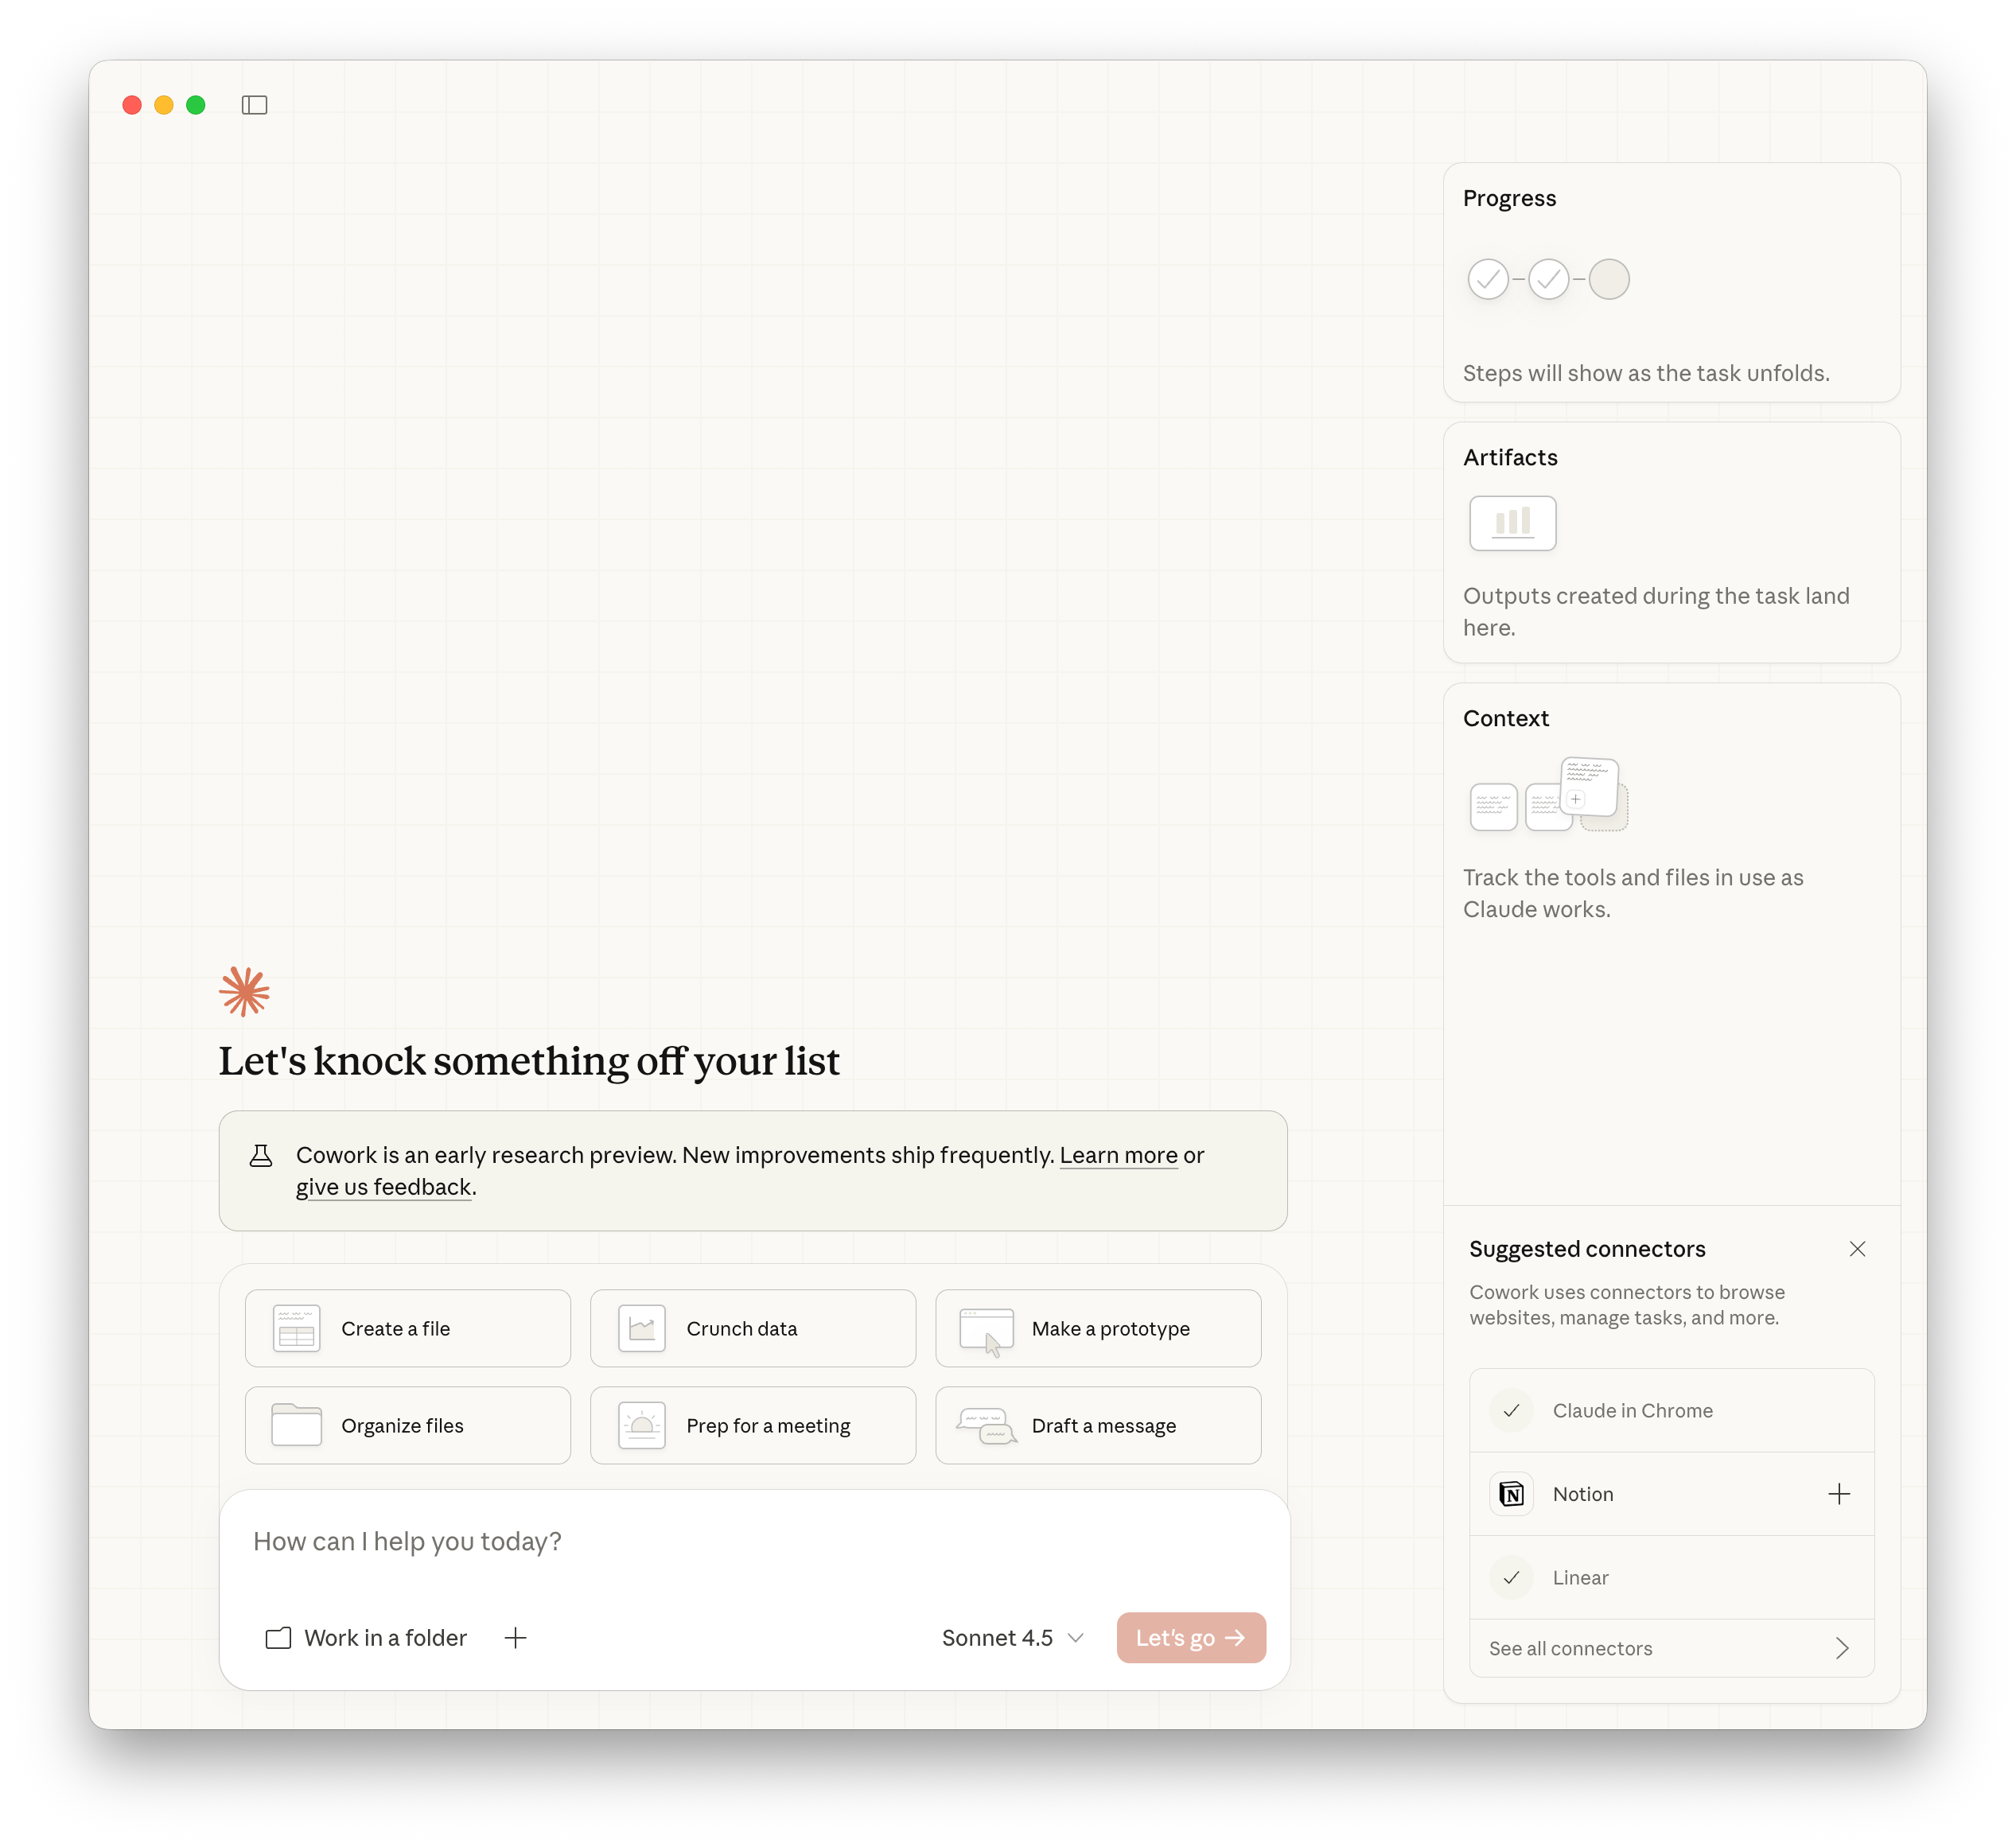
Cowork gives you a streamlined version of Claude Code’s capabilities, without needing to install VS Code or configure a workspace. It’s a good way to test the concept before diving into the full setup.
Anthropic has a tutorial here.
I might cover Cowork in a separate post, but for now, if you want the full power and flexibility of working with your own folder structure and custom configurations, keep reading. We’re setting up the full Claude Code environment.
Step 1: Install VS Code
What is VS Code?
VS Code is a free app from Microsoft. It’s basically a fancy text editor that lets you work with files and folders (I’m oversimplifying). Developers use it to write code, but we’re using it because Claude Code plugs into it.
Think of it as Claude’s office. It’s where Claude can see your files, read your documents, and actually help with your work.
Feel free to use any other editor like Cursor or whatever. I’m using VS Code because it’s free, open-source (you know me), widely used, and gets frequent updates. You’ll find it here.
First time opening VS Code:
When you first open it, you’ll see a welcome screen with a bunch of options. Ignore all of it for now. We just need the app installed.
You should see:
A sidebar on the left (this shows your files)
A big empty area in the middle (this is where you’ll work)
Maybe some welcome tabs (you can close these)
That’s it. VS Code is ready.
Step 2: Install Claude Code
Now we add Claude to VS Code.
First, you need a Claude account. If you don’t have one yet, go to claude.ai, and sign up for Claude Pro (USD20/month - this post is not sponsored!)
Installing Claude Code:
There are two ways to do this. I’ll give you the easiest one.
The Easy Way (Recommended):
Open VS Code
Click on the Extensions icon on the left sidebar (it looks like four squares, one floating away)
In the search bar, type “Claude”
Find “Claude Code for VS Code” by Anthropic and install
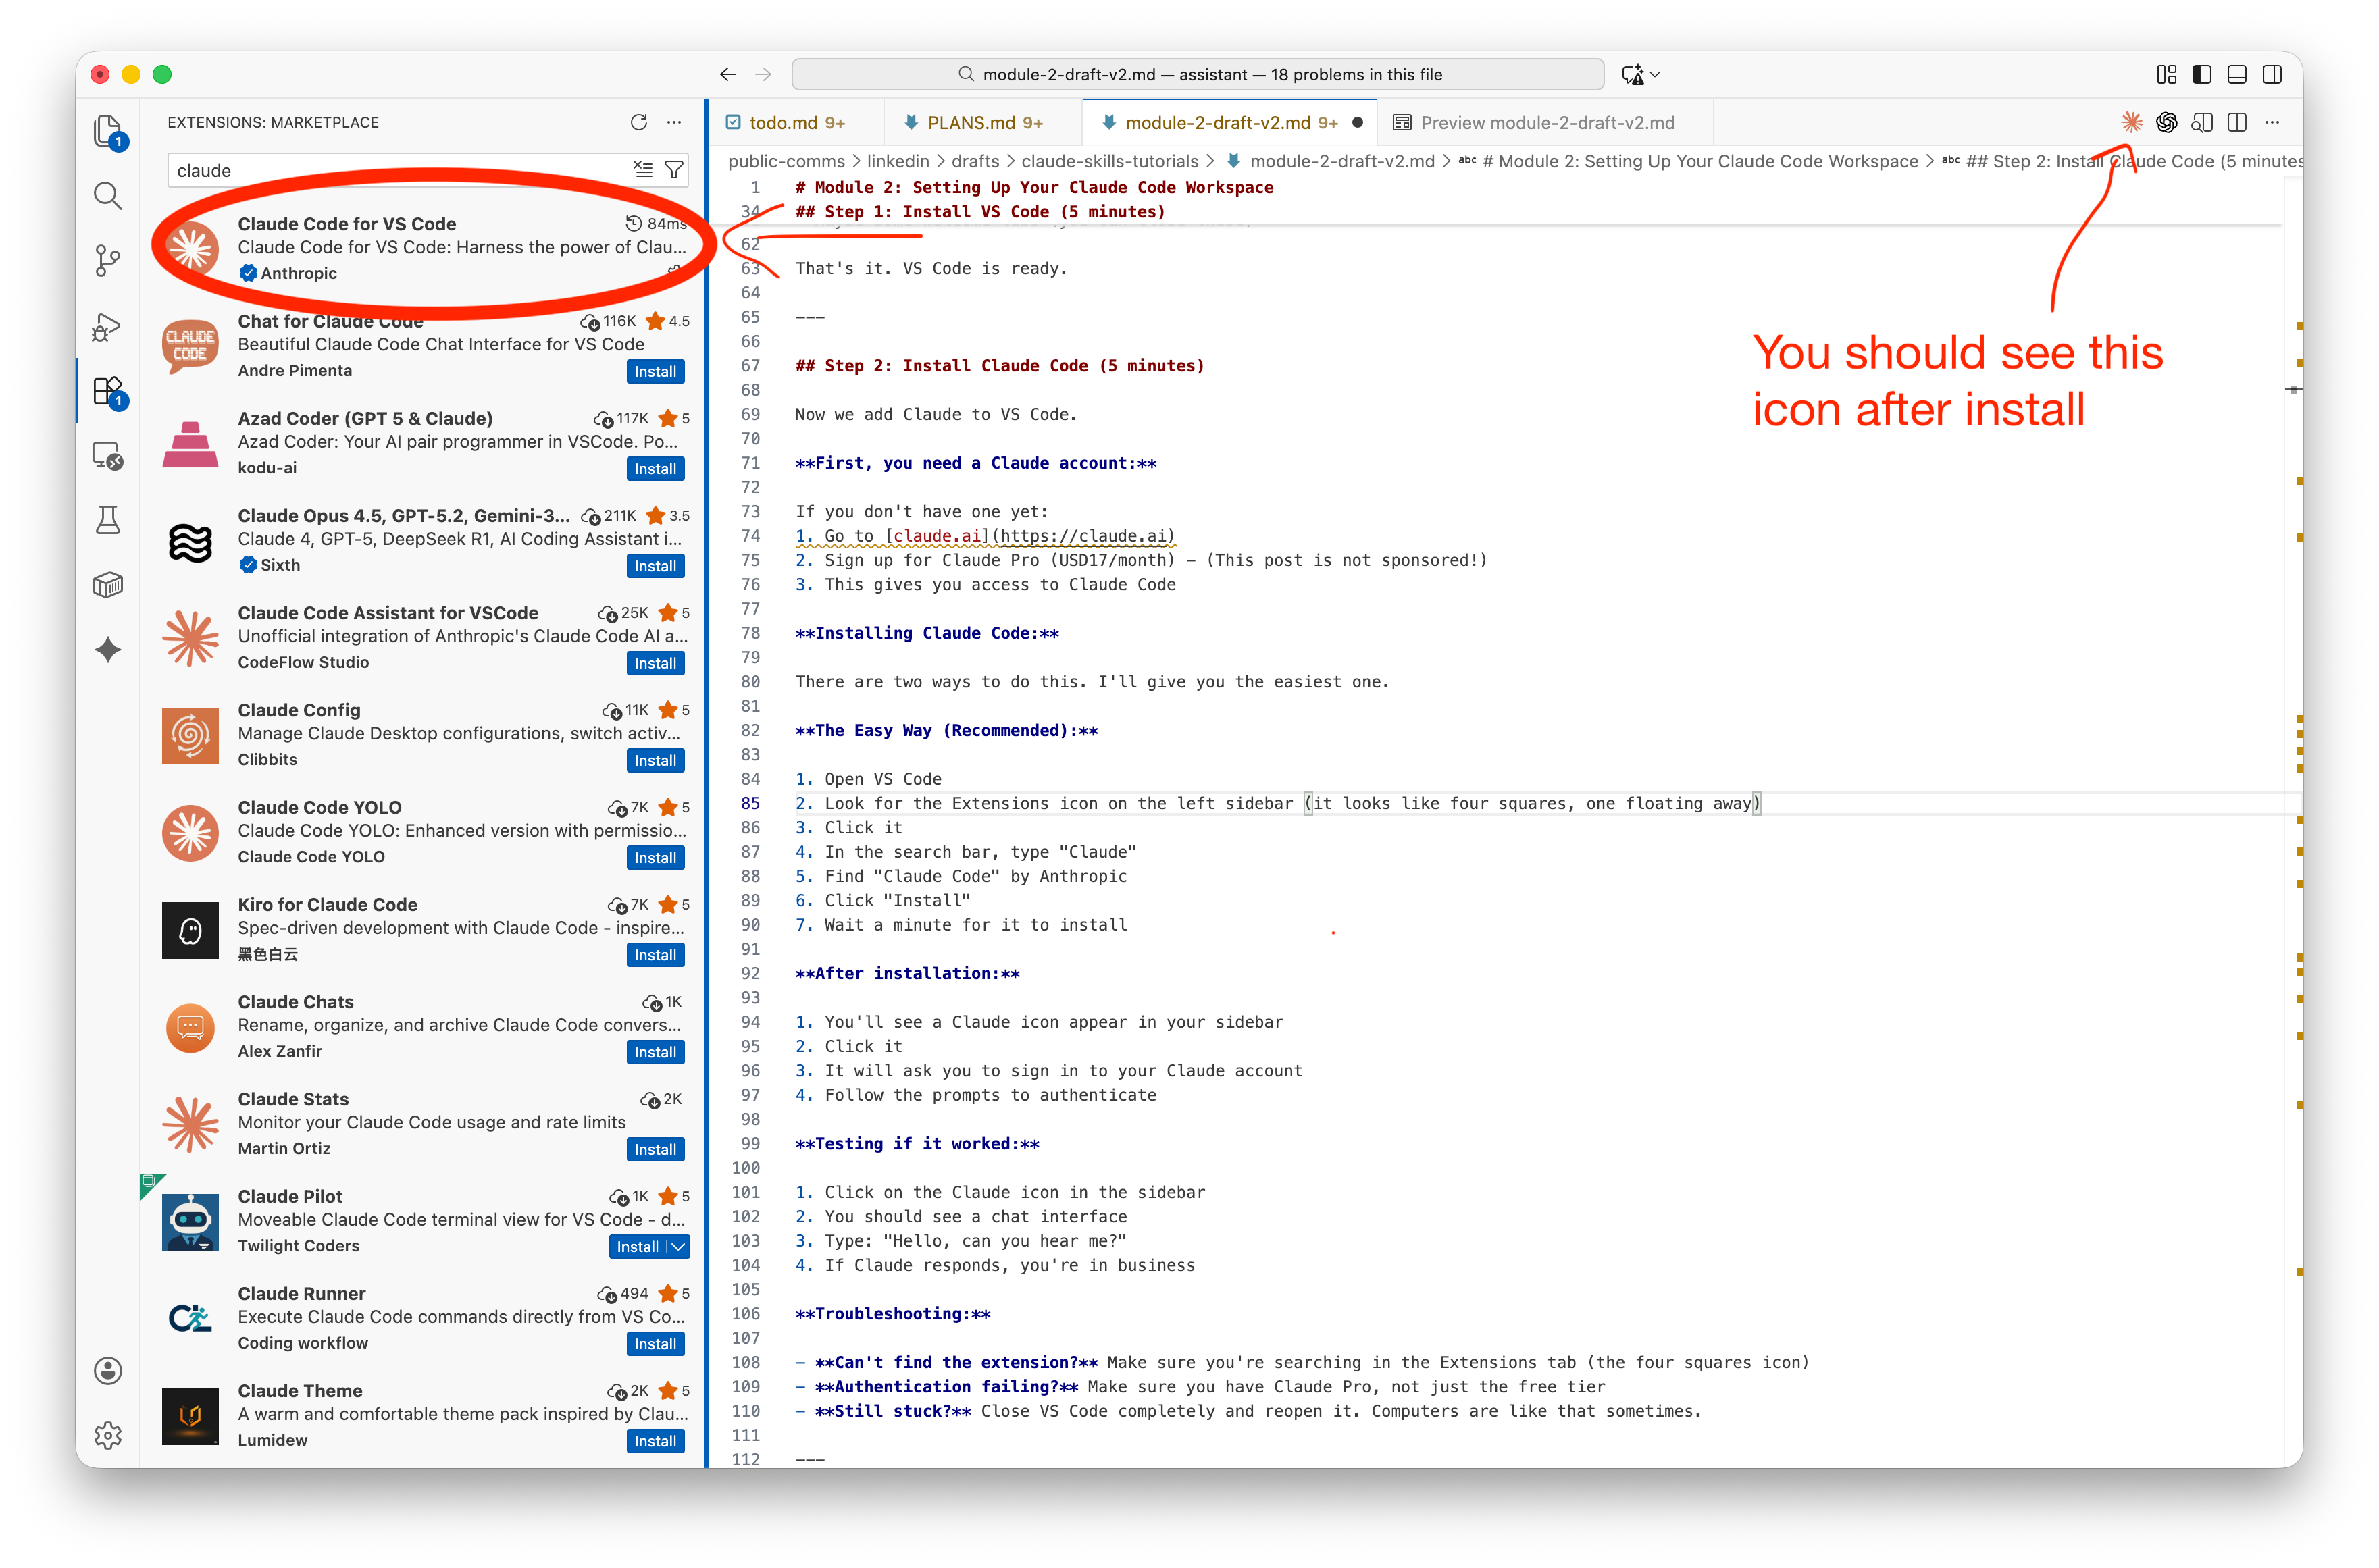
After installation:
You’ll see a Claude icon appear in your sidebar (Arrow #3 on the screenshot). Click it
It will ask you to sign in to your Claude account. Follow the prompts to authenticate
Testing if it worked:
Click on the Claude icon in the sidebar
You should see a chat interface
Type: “Is this AGI?” (kidding)
If Claude responds, you’re in business
Step 3: Create Your Folder Structure
Now we create the folders where your work will live. This is where Claude Code becomes different from regular Claude. It can actually see and work with these files.
Where to put your workspace:
I recommend putting it somewhere that automatically backs up:
Dropbox:
~/Dropbox/my-assistant/Google Drive:
~/Google Drive/my-assistant/iCloud:
~/Documents/my-assistant/(if you use iCloud)
If you don’t use cloud storage, just put it in your Documents folder. But seriously, set up some kind of backup. Your work matters.
Creating the folders:
You can do this the normal way (right-click > New Folder) or use VS Code. Here’s the VS Code way:
In VS Code, go to File → Open Folder
Navigate to where you want your workspace (Dropbox, Documents, wherever)
Click “New Folder” and name it
my-assistant(or whatever you want)Open that folder
Now you’re in your workspace. Let’s create the structure.
The simple structure:
There are two ways to decide how to structure your workspace:
Design it intentionally: think about how you want to organize your life/work (your priorities, the projects you actually run week-to-week), then create folders that match that reality.
Ask a chatbot that already knows you: if you’ve been chatting with ChatGPT/Claude for a while, it has a pretty good model of your world. Ask it: “If you were organizing my workspace folders, what would you create?” Then copy the suggestion and tweak it.
Example: when I did this, it suggested top-level folders for Mizal (the startup I’m cofounding), teaching, consulting, and research.
For now, we’re keeping this minimal. Don’t worry, you can expand later. But it’s an important step. This folder structure becomes the default way you’ll store context and structure your thinking, so be opinionated about it.
For a simple journalism workflow, we can think about something like this:
my-assistant/
├── context/           # Info about you and your work
├── sources/           # Background materials, research
├── projects/          # Your active work
└── claude.md          # Instructions for Claude (Don't create it, we'll do this next)
To create new folders in VS Code, Right-click in the empty sidebar area and click… “New Folder”! Do this for: context, sources, projects
Step 4: Creating the claude.md file
The claude.md file is special. It’s the first thing Claude reads when you open your workspace. Think of it as a “read this before you do anything” note. It tells Claude who you are, what you’re working on, and how you like to work.
We’ll create it now, then fill it with instructions in the next step.
Right-click in the sidebar
Click “New File”
Name it
claude.mdPress Enter
You now have your basic structure. We’ll fill in the claude.md file next.
Best practice: You can also ask Claude to create it for you by typing
/initin the chat. That works best when your folder already has real project files since Claude will read them and produce a more usefulclaude.md. If the workspace is empty, create the file yourself first so things stay tidy and deliberate. You can always run/initlater once you’ve added material.
Step 5: Understanding Markdown Files
If you’ve been following along and just created your first .md file, you might be wondering: what the heck is this format, and why aren’t we just using a normal Word doc? Fair question. It looks a bit odd at first, but once you get the hang of it, it actually makes a lot of sense. And as a bonus, AI agents absolutely love working with Markdown.
Wait, what’s a .md file?
The .md extension stands for Markdown. It’s a simple way to format text using plain characters. Basically a step above a .txt file, but way simpler than Word.
Why Markdown?
It’s just text, so it works everywhere (no proprietary formats)
You can read it even without formatting (unlike Word’s behind-the-scenes code)
AI agets works with it natively, no conversion needed
How it works:
Instead of clicking buttons to make text bold or create headers, you use simple symbols:
# This is a heading
## This is a smaller heading

**This text is bold**
*This text is italic*

- This is a bullet point
- So is this

[This is a link](https://example.com)
You don’t need to memorize this. Just type normally, and when you want formatting, either:
Ask Claude to format something for you
Look at examples in your existing files
Use VS Code’s preview feature (right-click on the file name > “Open preview”)
Bottom line: Markdown files are just text files with simple formatting. You can edit them in any text editor, but VS Code’s preview feature makes it easy to see what they’ll look like when formatted.
Step 6: Write Your First System Instructions
Open your claude.md file (click on it in the sidebar) and paste this or edit the file if you generated it with Claude:
# My Assistant

## About Me
[Write 2-3 sentences about what you do. Example: "I'm a journalist covering education policy for Metro Daily News. I focus on school funding, teacher contracts, and school board politics."]

## How I Work
- I prefer direct, clear communication
- When I ask for help with research, give me bullet points I can quickly scan
- Always tell me if you're unsure about something

## Current Projects
[List what you're currently working on. Example:
- School funding story (in /projects/school-funding/)
- Daily news monitoring
- Interview prep for upcoming sources]

## Important Notes
- Always ask before making changes to files
- When I say "draft," I mean a starting point I'll edit, not a final version
Customize this for yourself. Replace the examples with your actual information.
Why this matters: Every time you open this workspace, Claude reads this file first. It means Claude starts with context about you, instead of you having to re-explain everything.
This is the foundation of the “persistent assistant” concept from Module 1.
Step 7: Add Essential Plugins
Before we test, let’s add two plugins that make Claude Code much more useful.
Document Skills Plugin
This lets Claude read PDFs, edit Word documents, and analyze spreadsheets. If you work with any documents (and who doesn’t?), you need this.
Install it (quickly):
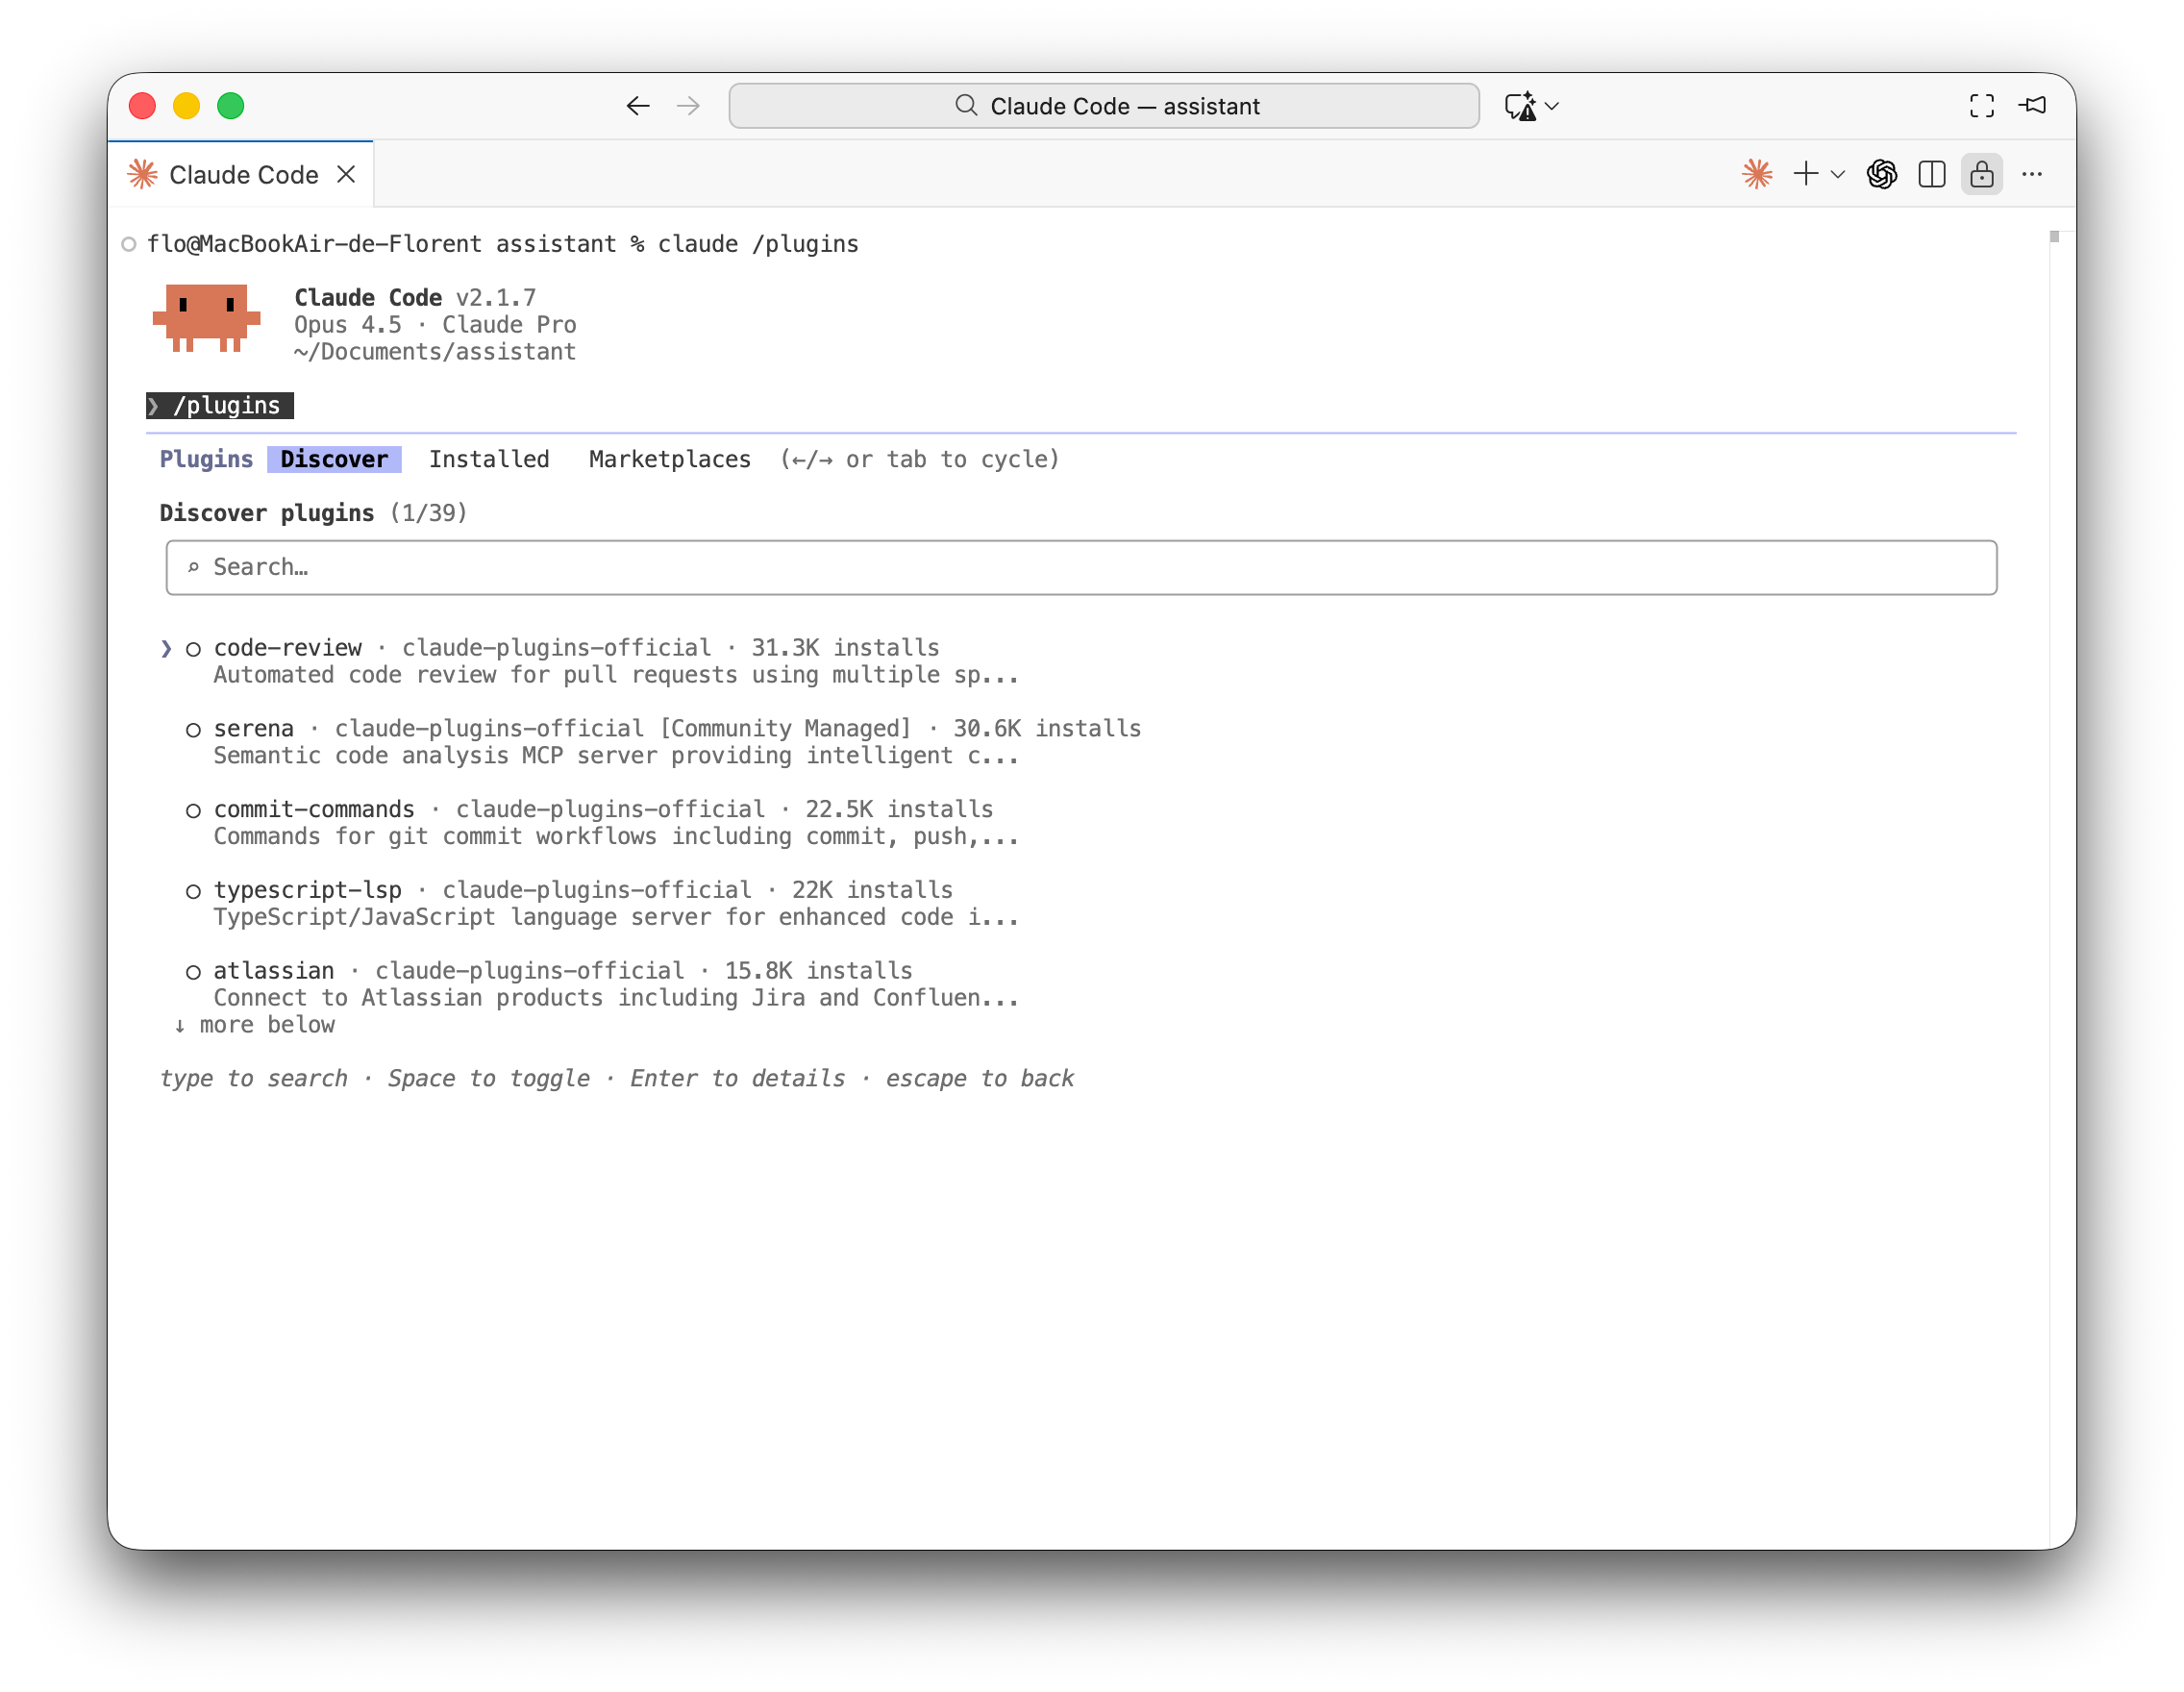
In the Claude chat, run:
/pluginsThis opens the plugin UI in a terminal-ish pane (yep, you just crossed the wall of the terminal).
Press
Tabuntil Marketplaces is selected, then add/install the Anthropic marketplace catalog:anthropics/skills.Switch back to Discover (left arrow), search
document-skills, then install it.
When it finishes installing, switch back to the chat.
What this enables:
Read PDFs (reports, research papers, meeting notes)
Edit Word documents
Analyze spreadsheets (CSV, Excel)
Create presentations (if you need that)
Test it: Drop a PDF into your /sources/ folder and ask Claude to summarize it. If it works, you’re good.
Step 8: Test It With a Real Task
Let’s make sure everything works.
Test 1: Can Claude see your files?
In the Claude chat (click the Claude icon in the sidebar), type:
What files and folders can you see in my workspace?Claude should list your folders (context, sources, projects) and your claude.md file.
If it works: Great! Move on. If it doesn’t: Make sure you opened the correct folder in VS Code (File → Open Folder).
Test 2: Does Claude know who you are?
Type:
What do you know about me and my work?Claude should reference what you wrote in your claude.md file.
If it works: Your system instructions are being read correctly. If it doesn’t: Check that your claude.md file is in the root of your workspace (not inside a subfolder).
Test 3: Can Claude create files?
Type:
Create a file called "test-note.md" in my projects folder with a simple reminder about something I should do tomorrow.Claude should create the file. You’ll see it appear in your sidebar.
Check that the file exists and has content. If it does, your setup is complete.
You can delete test-note.md after confirming it works.
What You’ve Built
In 30 minutes, you now have:
✅ VS Code installed and running
✅ Claude Code connected to your Claude account
✅ A workspace folder structure
✅ System instructions that Claude reads automatically
✅ Confirmed that Claude can see and create files
What this enables right now:
Ask Claude to read/summarize anything in your workspace (notes, drafts, PDFs, etc.)
Generate new files (drafts, templates, checklists) in the right folders
Iterate directly in-place on documents instead of copy/paste into chat
If you allow it, pull context from websites via web fetching
This is the foundation. Everything else builds on this.
Making It Useful: Your First Real Workflow
Let’s do something practical. We’ll set up a simple workflow you can use starting tomorrow.
Example 1: Beat Coverage Building
The scenario: You cover city council. Meetings every two weeks. Same cast of characters. Recurring issues.
Create a folder: projects/beat/city-council/
Drop your notes and official documents in there: meeting agendas, approved minutes, budget reports, whatever the city publishes. Claude can cross-reference everything.
(In a later module, we’ll set up automatic transcription of city council meetings from YouTube feeds. For now, we’re keeping it manual.)
Two weeks later, before the next meeting:
I'm covering tonight's city council meeting. Review the last 3 meetings and tell me what issues are still unresolved and which councillors have been pushing them.Claude reads your past notes and documents, and gives you a briefing. You walk into the meeting with your expertise complemented by this recall. You know the beat, Claude tracks the details.
After the meeting:
Add tonight's notes and tell me what shifted. Did the mayor change position on the transit vote? Did anyone flip?That’s institutional memory. You’re not re-reading your own notes. Claude tracks the through-lines.
Example 2: Source Tracking
The scenario: You interview the same experts repeatedly. Hospital administrators. School superintendents. Local researchers.
Create a folder: sources/experts/
After your first interview with Dr. Chen: You can ask Claude something like this:
Create a source file for Dr. Chen at sources/experts/dr-chen-health-policy.md

Include:
- Her title and expertise
- [insert your notes and interesting quotes]
- Note to follow up in March when budget comes out
Three months later, preparing for a follow-up interview:
I'm interviewing Dr. Chen tomorrow about the new budget.
Search for any recent public statements from her and update her file. Then tell me what she said last time and what I should ask about now.
Claude searches the web for her latest public declarations, adds them to her source file, then pulls all her past positions to brief you. You walk in with a complete picture, not scrambling through old notebooks.
After the interview:
Add today's quotes to Dr. Chen's file and note if her position changedOther ways to use this:
FOI/Document Tracking: Save freedom of information responses in a folder. Track your requests if you need to do follow-ups. When new documents arrive, ask Claude to compare them to past versions and flag what changed.
Story Research Accumulation: Long-form investigations? Create a folder that grows over months. Court documents, interview notes, timelines. Ask Claude to connect new information to what you already have. (Don’t put confidential source info here — we’ll cover security practices in Module 5.)
Optional: Advanced Folder Structure
The simple structure we created (context/, sources/, projects/) is enough to get started. But if you want to get more organized, here’s an example of a more detailed structure you can grow into:
my-workspace/
├── .claude/
│   ├── skills/              # Custom workflows (we'll build these in Module 4)
│   └── subagents/           # Specialized agents for complex tasks
├── context/
│   ├── voice-profile.md     # Your writing style and preferences
│   ├── beat-profile.md      # Your coverage area and expertise
│   └── outlet-profile.md    # Publication guidelines and audience
├── sources/                 # Background research and materials
├── projects/
│   ├── stories/            # Active stories (sensitive)
│   ├── drafts/             # Article drafts in progress
│   └── foia-tracking/      # FOIA requests and tracking
├── archives/
│   ├── published/          # Published articles
│   └── research-notes/     # Background research archive
├── monitoring/
│   ├── daily-scans/        # Daily source monitoring outputs
│   └── social-media/       # Social media post drafts
└── claude.md               # System instructions
You don’t need this on day 1. Start simple. As you use Claude Code and figure out your workflows, you can add folders that make sense for your work.
For example:
If you do a lot of FOIA requests → add
projects/foia-tracking/If you’re building a social media workflow → add
monitoring/social-media/If you write for multiple outlets → add detailed profiles in
context/
The structure should evolve with your needs. Don’t over-organize before you know what you need.
What’s Next
You have a working setup. Now what?
This week, try these:
Create a todo.md file in your workspace root to track ongoing tasks and projects. Drop items in there yourself, ask Claude to help you maintain it.
Start each day by opening your workspace and asking Claude to create a daily note
Drop a document into your
/sources/folder and ask Claude to summarize itBefore a meeting or interview, add background materials and ask Claude to help you prepare questions
In Module 3, we’ll set up the same kind of system using Codex (OpenAI’s version), so you can compare and decide which fits your workflow better.
In Module 4, we’ll add the advanced features: MCP integrations, custom skills, and subagents for complex research tasks.
But honestly? What you have now is enough to start being useful. The best way to learn is to use it for real work and see what clicks.
Your Questions Answered
Module 1 sparked some great conversations on LinkedIn, from concerns about the technical barrier to questions about data privacy and the role of AI in journalism. Here’s my take on the most important ones.
Q: “Does the VS Code environment itself still feel like a barrier to journalists even without coding syntax?” — Mia Sahl
Honestly? Yes, for some people. VS Code looks technical, and that can feel intimidating at first. But here’s why it’s worth pushing through:
The barrier isn’t the tool itself — it’s that most interfaces hide what’s happening. VS Code shows you the file structure, lets you see exactly what Claude is doing, and gives you full control. Once you get past the initial “this looks like code” reaction, it becomes incredibly efficient. The chat window is just a conversation. The files are just documents.
That said, if VS Code never clicks for you, tools like Cowork are simplifying this interface. But for now, I think the learning curve is worth it for the control you get.
Q: “How do I make sure my data isn’t used to train LLMs? This shouldn’t wait until Module 5.” — Sharon Machlis
This is crucial. Here’s what you need to know:
When you use Claude Code, your prompts and file contents are sent to Anthropic’s servers. Anthropic says they don’t train on conversations from their consumer products (Claude Pro, Claude Code), but you should verify their current terms.
Don’t put these in your workspace:
Source identities or confidential communications
Unpublished investigations with sensitive details
API keys, passwords, or credentials
Personal information you wouldn’t want processed by a third party
Safe to use:
Public documents you’re analyzing
Your own notes and drafts
Published articles you’re organizing
Research from public sources
Part of the answer also has to do with running open-source models directly on your computer. We’ll get into that in a later module.
The rule of thumb is: if you wouldn’t be comfortable with that information being processed by an AI system, don’t put it in your workspace.
Q: “Isn’t this workflow outsourcing the ‘thinking’ part? How do you develop expertise without doing that hard work?” — Paul Donoughue
This is an important question, and I think it’s actually backwards.
Reading widely, going down rabbit holes, dismissing wrong information: that is the work. Claude doesn’t replace that. It helps you organize what you’ve found so you can think more clearly about it.
The expertise comes from:
Deciding what sources to ingest
Asking the right questions
Recognizing when Claude’s summary misses something important
Connecting dots that no model would see
Knowing which rabbit holes are worth going down
If you’re using this to avoid reading documents, you’re doing it wrong IMO. If you’re using it to quickly resurface what you’ve already read and analyzed, that’s the point.
As for “why not let AI write the whole story?”: because journalism isn’t just assembling information. It’s judgment, news sense, source relationships, accountability to your audience. Those don’t get automated. This workflow helps you think better, not think less.
But hey, that’s just my take. Curious to hear what you think so drop your thoughts in the comments!
One Last Thing
If you got stuck anywhere, that’s normal. Tech setup is annoying, and something always goes wrong the first time.
Drop a comment with where you got stuck, and let’s build this together. The goal isn’t perfection. It’s having a working system you can start using. Once it’s running, you’ll figure out what works for your specific workflow.
See you in Module 3 for the Codex version!
P.s.: Thanks to Chad Skelton for catching two link errors!
Thanks so much - very pleased I managed to get this set up and running! When adding the Anthropic marketplace catalog I got an error message using anthropic/skills, but anthropics/skills worked...
Great workflow Florent! It has helped me a lot. I will look for the next chapters. Only as it is useful to someone: in order to install skills marketplace I firstly had to install git in my computer (Linux, Zorin OS).